When people find out that I run a pizza blog, one question I am often asked is whether or not I like to cook pizza. My answer is always a resounding no. It’s not necessarily by choice that I don’t make my own pizza. I’ve always used my small, unreliable oven and the abundance of high quality pizza places near me as excuses for why I’ve never delved into the world of pizza making. But recently, I’ve been inspired to set my preconceptions aside and start learning about the art — and yes, it is an art — of pizza making.
Earlier this month I took my first pizza making class with Pizza a Casa run by New York chef Mark Bello. Literally, Pizza a Casa means “pizza at home.” And it was a particularly appropriate name for this class for two reasons. First — the class places an emphasis on how to make pizza in a tiny New York City kitchen like mine. For example, we talked about different types of home ovens and how to utilize a tiny space. And second — the class actually took place in Mark’s apartment. So the delicious pies we made were proof that you don’t need a fancy kitchen and expensive equipment to make a good pie. Perhaps the class might have been more appropriately titled Pizza a Apartamento, but we’ll leave it at that!
The group — six of us — met Mark at Alleva Dairy in Little Italy. It was established in 1892 and is considered the oldest Italian cheese shop in America. We tasted some different cheeses and Mark showed us different products in the store and explained why particular flours and sauces were better for making high quality pizza.


We continued on a walking tour of the area, stopping at landmark stores such as Piemonte Ravioli Co. and Di Palo’s — picking up ingredients on the way. Mark showed us some of his favorite spots in the area — both pizza and non-pizza related. When we arrived at the apartment, we each set up shop at a different station which contained supplies: an apron, tupperware, a mixing bowl, a yeast packet, and an instruction manual.


The first step was making the dough which consisted of yeast, warm water, and unbleached all-purpose flour. Each of us made enough dough for four pies, although most of us ended up making 2-3 and taking the leftover dough home. Mark had two pizza stones and all together we made 17 pies.


Mark made the first three pies and showed us the process step by step. He favors a DJ-like motion to roll out the dough, similar to that of a DJ spinning a turntable. Putting a bit of semolina flour on the pizza peel before you roll out the dough is necessary. The first ingredient to typically go on the pie is cheese — fresh mozzarella in the photo below. After that, throw on just a bit of sauce. It can be put on in clumps using a spoon and does not need to be spread in a circle-like motion that you might normally associate with sauce distribution. For the sauce, we used a can of crushed tomatoes and added a tad of sugar and salt + a few cloves of fresh peeled raw garlic.
After a little of oil and some grated pecorino… it’s oven time! The main tip I learned regarding heat is that opening your oven for even a second can drop the temperature 50 degrees, so when opening the oven door, do it as quickly as possible. And in general, generating enough heat to cook a pizza is probably the most difficult part about turning the oven in your kitchen into a pizza making machine. At a pizzeria it’s not uncommon for ovens to get as hot as 1,000 degrees. A home oven typically tops out around 500 degrees. Using pizza stones — the thicker, the better — enables you to maximize the amount of heat that reaches the pie.
When Mark’s first pie was finished, we added some basil and olive oil… and just like that we had a delicious margarita pizza.
The following photos chronicle the first of two pies I made during the class.
Step 1: Fresh mozzarella

Step 2: Red onions and mushrooms

Step 3: Grated pecornio

Step 4: A dab of sauce (La Bella San Marzano)

Step 5: Oven time!

Step 6: Final product (with basil and a bit more olive oil)

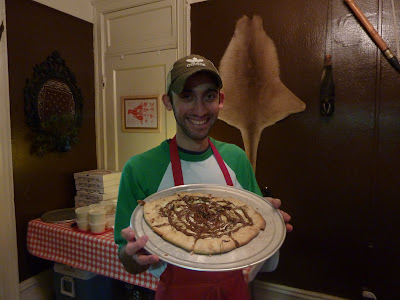
And a few shots of the 2nd pie I made… a dessert pie! It consisted of mozzarella, ricotta, bananas, nutella and honey!


Here are a couple more pics of our group hard at work!

 I Dream Of Pizza A Pizza Blog, Established In 2008


